

Beginning a workout schedule can appear overpowering, particularly with so much hardware. Why select a stationary bicycle? Well, the reasons are basic however compelling. To begin with the address:
Do you battle to discover time for the exercise center? Numerous of us do. A stationary bicycle at domestic cuts down on pardons. No travel, no pressing equipment, no squandered time. Moment address:
Are you concerned about joint push? Not at all like running, cycling is delicate on your joints. It offers cardio benefits without the tall effect.
For those who’ve delayed to begin working out, consider this. A stationary bicycle gives a direct, successful way to wellness.
On the off chance that you need to start your wellness travel with negligible bother, a stationary bicycle might fair be your best wager.
Stationary bike workout for beginners – Start Cycling Today

Why Choose a Stationary Bike?
Beginning a workout might appear overwhelming, but a stationary bicycle rearranges it. It’s not fair to another piece of exercise center equipment—it’s your door to wellness, particularly for fledglings.
- Ease of Use: No complicated settings or gear changes. It’s as straightforward as sitting down and pedaling.
- Safety: Lower risk compared to outdoor cycling. No traffic, no potholes, just you and your bike in the comfort of your home.
Setting Up Your Bike
Imagine starting your journey on an ill-fitted bike—uncomfortable, right? Setting up correctly is not just about comfort; it’s about efficiency. Here’s a quick guide:
- Seat Height: Your leg should have a slight bend (about 5-10 degrees) at the bottom of the pedal stroke. This prevents strain.
- Handlebar Height: Set it level with the seat to start. Adjust based on comfort and back strain. Correct posture is key to avoiding long-term injuries.
The Workout: What to Expect
What does a beginner’s workout look like? It’s about finding a balance between challenge and enjoyment:
- Duration: Begin with 20 minutes. It’s long enough to gain benefits without being overwhelming.
- Resistance Levels: Start low to warm up, then increase gradually. Each session should push you a bit more, building both strength and stamina.
Health Benefits
Stationary biking is more than physical activity; it’s a contributor to your overall well-being:
• Cardiovascular Wellbeing: Normal sessions offer assistance in lowering blood weight and making strides in heart well-being, basic for life span.
• Muscle Tone and Quality: Targets key muscle bunches like quads, calves, and glutes. Over time, you’ll see not only fair quality but also definition.
• Calorie Burn: On normal, cycling can burn between 400-600 calories per hour, making it an effective device for weight administration.
Tips for Success
Mastering the stationary bike involves more than just pedaling. Here’s how to excel:
- Stay Hydrated: Drink water before, during, and after your workout. Hydration affects performance and recovery.
- Listen to Your Body: Increase intensity gradually. Pain should not be part of your workout. If something hurts, adjust your setup or reduce your intensity.
- Consistency is Key: Aim for 3-4 sessions a week to establish a routine. Regularity brings results.
Personal Testimonies from Beginners
Take it from Sarah, an endorser of our community, “When I to begin with got on a stationary bicycle, I couldn’t final 10 minutes.
Presently, I’m cycling through 45-minute sessions. It’s not around wellness; it’s about how enabled I feel with each pedal stroke.”
Stationary biking offers a dependable, secure, and successful way to move forward with your wellness. With each session, you’re not fair working out; you’re building a more advantageous, more grounded form of yourself.
Choosing the Right Stationary Bike – Features to Consider

Selecting the culminate stationary bicycle isn’t almost about picking a show off the rack; it’s approximately finding a wellness accomplice that suits your way of life, objectives, and individual consolation.
Here’s a more profound plunge into the sorts of stationary bicycles and the fundamental highlights to keep an eye on, guaranteeing you make an educated choice that upgrades your workout encounter.
Types of Stationary Bikes
Upright Bikes: The Classic Choice for Cardio Enthusiasts
Upright bicycles mimic the involvement of a conventional street bicycle, requesting you to lock in your center and upper body, hence giving an all-encompassing workout. Here’s why they may be your go-to choice:
· Feel and Encounter: They offer a riding involvement comparable to open-air bikes, culminating for those who appreciate the recognition of a routine cycling pose.
· Wellbeing Benefits: Incredible for boosting cardiovascular wellness, they too offer assistance in calorie burning. Riding upright can burn anywhere from 500 to 1000 calories per hour, depending on concentration.
· Space Effectiveness: Ordinarily more compact, they fit well in smaller spaces, making them perfect for loft tenants.
Recumbent Bikes: The Comfort King
With a laid-back design, recumbent bikes are the luxury sedans of the stationary bike world. They are particularly beneficial for those with back issues or limited mobility:
- Ergonomic Advantages: The reclined seat offers superior lower back support, allowing for longer, pain-free rides.
- Targeted Muscle Use: Focuses on the lower body muscles like quads, hamstrings, and calves without straining the back.
- Stability and Accessibility: The low-to-ground design provides excellent stability, reducing the risk of falls and injuries, making it a favorite among older adults and those in rehabilitation.
Spin Bikes: For the High-Energy Cyclist
Spin bikes are engineered for intensity and endurance, mimicking the high-energy environment of spin classes that many fitness enthusiasts adore:
· Construct for Concentrated: With highlights like an overwhelming flywheel and movable resistance, turn bicycles are perfect for interim preparation, making a difference in moving forward both quality and cardiovascular wellbeing.
· Calorie Incinerator: Reasonable for energetic workouts, you’ll be able to anticipate to burning a critical number of calories, compared to what you’d in a challengiopen-airair ride.
· Compact and Vigorous: Even though they pack a punch within the workout office, their plan is regularly more streamlined than other sorts, making them a down-to-earth choice for domestic exercise centers.
Key Features to Look For
Advanced Adjustable Resistance
- Precision in Training: Look for systems that offer fine-tuned resistance adjustments. This allows for precise control over your workout intensity, making it suitable for gradual progression or high-intensity bursts.
Enhanced Comfort Features
- Personalized Fit: Adjustable features should extend beyond the seat and handlebars. Look for pedals that can be customized for foot positioning and straps for added security.
- Comfort Over Time: Additional padding on seats and ventilated materials can significantly enhance comfort, encouraging longer and more frequent workouts.
Sophisticated Display and Tracking Features
- Smart Technology Integration: Modern stationary bikes often integrate with apps and tracking systems that not only monitor your stats but also provide interactive workouts, virtual scenery, and even coaching sessions.
- Data-Driven Workouts: Accurate tracking of heart rate, distance, speed, and cadence can guide your training decisions, helping you to optimize each session for maximum benefit.
Space-Saving Design Options
- Adaptable to Your Space: Some models are designed to be folded or easily moved, which is crucial if your living space doubles as your workout area.
Tips for Choosing the Right Stationary Bike
- Reflect on Your Fitness Vision: Whether it’s shedding pounds, building endurance, or rehabilitating, align your bike choice with your overarching health goals.
- Test the Waters: If possible, try out different models. Just like test-driving a car, feeling how the bike responds to your body can be a game-changer.
- Expert and User Reviews: Dive into the experiences of others. What are seasoned cyclists saying? What do beginners prefer? Gathering diverse insights can lead to a better decision.
Essential Setup Guide for Your Stationary Bike
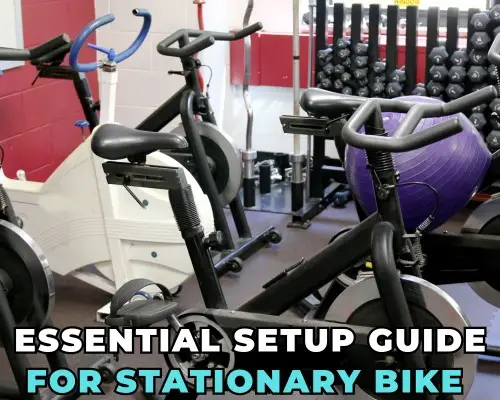
Getting your stationary bicycle setup fair right isn’t just approximately comfort—it’s around changing each pedal stroke into a more successful workout.
Let’s jump into the fine craftsmanship of bicycle setup with a center on personalizing each alteration for your body. This way, you can ensure maximum comfort and efficiency, akin to tailoring a suit to fit perfectly.
Adjusting Seat Height: The Foundation of Your Ride
Step 1: Stand Beside the Bike
- Positioning: Position yourself next to the bike as if it’s a loyal companion. Your feet should be flat on the ground, establishing a stable base.
Step 2: Check the Saddle Height
- Initial Adjustment: Set the saddle so it aligns with your hip bone. This is more than a good guess—it’s about syncing the bike to your body’s central pivot point.
Step 3: Sit on the Bike
- Testing the Feel: Mount the bike gracefully. Place your feet on the pedals and sit as if you’re ready to conquer miles.
Step 4: Check the Knee Angle
- Optimal Bend: With the pedal at its lowest point, ensure your knee is slightly bent at about 5 to 10 degrees. This isn’t just about comfort; it’s about protecting your joints while maximizing power.
Step 5: Fine-tune the Seat Position
- Height Fine-tuning: Adjust the seat up or down until your knee position feels natural and your leg extends efficiently with each pedal stroke.
- Foot Placement: The ball of your foot should align with the pedal spindle. It’s a small adjustment that makes a big difference in your pedaling dynamics.
Adjusting Handlebar Position: Steering Towards Comfort
Step 1: Stand Beside the Bike Again
- Realign: Just like the first step, stand firm and ready to make the bike truly yours.
Step 2: Check the Handlebar Height
- Reach for Comfort: Adjust the handlebar height so you can reach it comfortably with a slight bend in your elbows, allowing you to maintain a posture that feels both relaxed and ready to engage.
Step 3: Secure Grip Check
- Handling Dynamics: Grip the handlebars in various positions. They should be easy to hold onto, without causing you to overreach or scrunch up, keeping your movements fluid and natural.
Step 4: Check the Elbow Angle
- Align for Action: Keep your elbows slightly bent. This isn’t just to keep you comfortable—it’s to keep you agile and ready to respond to your workout’s demands.
Step 5: Fine-Tune Handlebar Adjustment
- Custom Fit: Make the final tweaks to ensure the handlebars are not only within easy reach but also allow you to see all your metrics without straining your neck or eyes.
Additional Ergonomic Considerations: The Small Things That Make Big Differences
- Foot Straps: They should be snug but not restrictive, securing your foot without cutting off circulation.
- Pedal Position: Keep your knees in line—too far forward might tempt you to push harder than is healthy.
- Seat Angle: Adjust for a neutral tilt where you feel balanced, not tilting forward or backward, which can affect your pedaling efficiency.
- Handlebar Angle: Set it for a natural reach, one that feels like an extension of your arms rather than a stretch or a shrink.
Safety Tips for Beginners on Stationary Cycling

Beginning your travel with stationary cycling can be as exciting because it is advantageous. Be that as it may, acing the essentials of bicycle setup and riding method is pivotal not as it were for your execution but for anticipating wounds.
Let’s dive more profound into each common apprentice blunder, including layers of master exhortation and commonsense tips to guarantee you’re not fair riding, but flourishing.
Correcting Incorrect Seat Height
- Error: The seat set too high causes your hips to rock, while too low a seat compresses your knees excessively. Both extremes can lead to discomfort and potential injuries.
- Adjustment Technique: Align the seat so that at the lowest pedal point, your knee retains a slight bend of about 10-15 degrees. When the crank is parallel to the ground, your knee should align directly over it.
- Expert Tip: Use a plumb line from the knee to check this alignment accurately. This ensures you’re not just guessing but using a method trusted by cycling coaches.
Adjusting Poor Handlebar Position
- Error: Incorrect handlebar height can lead to reaching too far or not enough, straining your wrists, shoulders, and neck.
- Comfort Setup: Adjust the handlebars so your elbows are slightly bent and your posture remains neutral. This prevents any strain on your upper body and allows for dynamic movement.
- Practical Advice: If you’re experiencing back pain, it might be a sign that the handlebars are too low. Try raising them slightly, which can often alleviate discomfort and improve control.
Aligning Incorrect Pedal Position
- Error: Misaligned pedals can lead to awkward foot placements, stressing your ankles and affecting your pedaling efficiency.
- Foot Alignment: Ensure that the ball of your foot is over the center of the pedal. This maximizes power transfer and maintains natural leg alignment.
- Real-World Tip: Pay attention to any discomfort in your ankles or feet during a ride—it’s often a sign that adjustments are needed. Don’t ignore these signs; small tweaks can make big differences.
Overcoming Inadequate Warm-up
- Error: Jumping straight into intense cycling without a proper warm-up increases your risk of strains and sprains.
- Effective Warm-up: Begin with 5-10 minutes of light pedaling. At that point, join energetic extends such as leg swings and tender lurches to get ready for your muscles and joints.
- Why It’s Important: Thinks about propose that a energetic warm-up can move forward execution and diminish damage hazard by planning the muscles through developments they’ll perform amid the session.
Managing Over-Intensification
- Error: Too much too soon is a common beginner’s mistake, leading to overexertion and potential injuries.
- Gradual Increase: Build intensity gradually. Aim for a 10% increase in duration or intensity each week. This sustainable approach helps your body adapt without stress.
- Statistic to Know: Over 50% of sports injuries are due to overuse, highlighting the importance of gradual progression in any training regimen.
Maintaining Proper Posture
- Error: Slumping or hunching over can strain your back, shoulders, and neck.
- Posture Check: Engage your core, straighten your back, and relax your shoulders. Adjust your bike setup to help maintain this posture effortlessly.
- Personal Insight: Remember, good posture isn’t just about how you look; it’s about efficient energy use and preventing fatigue, making your ride smoother and more enjoyable.
Addressing Insufficient Stretching
- Error: Neglecting to stretch post-ride can lead to tight muscles and increased soreness.
- Post-Ride Stretch: Center on extending your calves, thighs, hips, and back. Hold each extend for at slightest 30 seconds to successfully protract the muscle strands.
- Stretching Benefit: Normal post-exercise extending can increment adaptability and diminish the chance of wounds, making it a basic portion of your cooldown schedule.
Ensuring Adequate Hydration
- Error: Inadequate hydration can lead to early fatigue and decreased performance.
- Hydration Plan: Drink water sometime recently, amid, and after your workout. A great run show of thumb is to taste approximately 7-10 ounces of water each 10-20 minutes amid cycling, depending on your sweat rate.
- Health Fact: Appropriate hydration makes a difference keep up your blood volume, guaranteeing supplements and oxygen are productively dispersed to your muscles and can progress your recuperation time.
As an Amazon Associate, I earn from qualifying purchases, at no additional cost to you. Read Our Affiliate Disclosure.